Advanced
Hardware Acceleration
- Dispatcharr does not currently support hardware acceleration directly, but you can use hardware acceleration with custom ffmpeg stream profiles.
- This will require mapping your hardware to the container and setting up a custom ffmpeg stream profile.
Mapping Hardware
- Install the NVIDIA Container toolkit
- Add a deploy section to your docker-compose.yml
Example
services:
  dispatcharr:
    # build:
    #   context: .
    #   dockerfile: Dockerfile
    image: ghcr.io/dispatcharr/dispatcharr:latest
    container_name: dispatcharr
    ports:
      - 9191:9191
    volumes:
      - dispatcharr_data:/data
    environment:
      - DISPATCHARR_ENV=aio
      - REDIS_HOST=localhost
      - CELERY_BROKER_URL=redis://localhost:6379/0
    deploy:
      resources:
        reservations:
          devices:
            - driver: nvidia
              count: all
              capabilities: [gpu]
volumes:
  dispatcharr_data:
- Add a devices section to your docker-compose.yml
Example
services:
  dispatcharr:
    # build:
    #   context: .
    #   dockerfile: Dockerfile
    image: ghcr.io/dispatcharr/dispatcharr:latest
    container_name: dispatcharr
    ports:
      - 9191:9191
    volumes:
      - dispatcharr_data:/data
    environment:
      - DISPATCHARR_ENV=aio
      - REDIS_HOST=localhost
      - CELERY_BROKER_URL=redis://localhost:6379/0
    devices:
      - /dev/dri:/dev/dri

volumes:
  dispatcharr_data:
- Install the NVIDIA Driver Package plugin from community apps if not already installed
- Edit the Dispatcharr docker container in Unraid
- Toggle Advanced View On
- Go to Extra Parameters
- Add
--runtime=nvidia
- Add
- Scroll down and click "Add another Path, Port, Variable, Label or Device"
- Config Type: Variable
- Name:
NVIDIA_VISIBLE_DEVICES - Key:
NVIDIA_VISIBLE_DEVICES - Value:
all
- Click Save
- Again click "Add another Path, Port, Variable, Label or Device"
- Config Type: Variable
- Name:
NVIDIA_DRIVER_CAPABILITIES - Key:
NVIDIA_DRIVER_CAPABILITIES - Value:
all
- Click Save
- Edit the Dispatcharr docker container in Unraid
- Scroll down and click "Add another Path, Port, Variable, Label or Device"
- Config Type: Device
- Name:
/dev/dri - Key:
/dev/dri - Description:
Intel GPU
- Click Save
Custom Stream Profiles
- Open Dispatcharr
-
Navigate to Settings > Add Stream Profile
- Name it anything you like
- Command
ffmpeg - Parameters will vary based on your hardware type and streaming needs
- See ffmpeg docs for more
- Visit our discord for more user-submitted ffmpeg parameters
Example
- Parameters:
-user_agent {userAgent} -hwaccel cuda -i {streamUrl} -c:v h264_nvenc -c:a copy -f mpegts pipe:1
Example
- Parameters:
-user_agent {userAgent} -hwaccel vaapi -hwaccel_output_format vaapi -hwaccel_device /dev/dri/renderD128 -i {streamUrl} -c:a aac -c:v h264_vaapi -f mpegts pipe:1
Example
- Parameters:
-hwaccel qsv -user_agent {userAgent} -i {streamUrl} -c:v h264_qsv -c:a aac -f mpegts pipe:1
Process Priority Configuration
Optional environment variables to adjust priority of various tasks. Lower values = higher priority. Range: -20 (highest) to 19 (lowest). Negative values require cap_add: SYS_NICE
UWSGI_NICE_LEVEL- Set priority for uWSGI, FFmpeg, and streaming. Default priority is 0, recommend -5 for high priorityCELERY_NICE_LEVEL- Set priority for Celery, EPG, and other background tasks. Default priority is 5
Reverse Proxies
Nginx
HTTPS config example (streams only via https, WebUI via local network and Wireguard)
Example (click to see)
# Dispatcharr HTTPS DynuDNS
server {
    listen 443 ssl;
    server_name dispatcharr.your.domain.com;  #Adjust for your domain

    ssl_certificate /etc/letsencrypt/live/yourdomain.com/fullchain.pem;
    ssl_certificate_key /etc/letsencrypt/live/yourdomain.com/privkey.pem;

    location ~ ^(/proxy/(vod|ts)/(stream|movie|episode)/.*|/player_api\.php|/xmltv\.php|/api/channels/logos/.*/cache|/api/vod/vodlogos/.*/cache/?|/(live|movie|series)/[^/]+/.*|/[^/]+/[^/]+/[0-9]+(?:\.[^/.]+)?)$ {
        allow all;  # Allow everyone else
        proxy_pass http://dispatcharrserver:9191;  # Adjust for your server name or IP
        proxy_set_header Host $host:443;
        proxy_set_header X-Real-IP $remote_addr;
        proxy_set_header X-Forwarded-For $proxy_add_x_forwarded_for;
        proxy_set_header X-Forwarded-Proto $scheme;
        # CORS settings
        add_header 'Access-Control-Allow-Origin' '*';
        add_header 'Access-Control-Allow-Methods' 'GET, POST, OPTIONS';
        add_header 'Access-Control-Allow-Headers' 'Origin, Content-Type, Accept';
    }

    location / {
        allow 10.0.0.0/22;  # Allow the local network, adjust for your network
        allow 10.1.0.0/24;  # Allow Wireguard, adjust for your network
        deny all;  # Deny everyone else
        proxy_pass http://dispatcharrserver:9191;  # Adjust for your server name or IP
        # WebSocket headers
        proxy_set_header Upgrade $http_upgrade;
        proxy_set_header Connection "Upgrade";
        proxy_set_header Host $host:443;
        proxy_set_header X-Real-IP $remote_addr;
        proxy_set_header X-Forwarded-For $proxy_add_x_forwarded_for;
        proxy_set_header X-Forwarded-Proto $scheme;
        # CORS settings
        add_header 'Access-Control-Allow-Origin' '*';
        add_header 'Access-Control-Allow-Methods' 'GET, POST, OPTIONS';
        add_header 'Access-Control-Allow-Headers' 'Origin, Content-Type, Accept';
    }
}
Tip
Even with a properly configured reverse proxy, your M3U output may be available over the internet. Follow these best practices to block standard M3U access and allow only with a specified username and password.
- Set up your reverse proxy as shown in the docs
- In dispatcharr at Settings > Network Access, restrict M3U / EPG Endpoints to your local network only (example: 192.168.1.0/24)
- Set up a user with XC password on the Users page if you haven't already done so
- Use the following m3u link format to share with your users:
https://hostname/get.php?username=XCUSERNAME&password=XCPASSWORD - And this format for epg:
https://hostname/xmltv.php?username=XCUSERNAME&password=XCPASSWORD
Pangolin
- Create your resource just as you would any other in Pangolin
- If you're hosting Dispatcharr on the same VPS (if you're using a VPS) as Pangolin, be sure to set it as a local resource and use 172.XX.X.X as the IP, then enter the port. Otherwise set it up normally
- If you'd like to enable Pangolin's SSO for this resource for security, do so in the Authentication tab of your new Dispatcharr resource
To allow Dispatcharr to connect to clients when secured behind Pangolin SSO or another IdP you've added, you need to create Bypass Rules. See below for the list of rules required. Once you save the below rules, Dispatcharr's WebUI will be secured behind your SSO while apps and services will be able to connect via XC
- The "Action" will be
Bypass Authfor all of them - The "Match Type" will be
Pathfor all of them
Bypass rules (click to see)
/player_api.php/*/get.php/*/xmltv.php/*/*/*/*.ts/proxy/ts/stream/*/proxy/vod/episode/*/proxy/vod/movie/*/api/channels/logos/*/cache//live/*/*/movie/*/*/series/*/*
(Optional for HDHR, M3U, and/or EPG URL access, not required if using XC. If you're using HDHR, M3U, or EPG, you should further restrict it in dispatcharr's Settings > Network Access > M3U / EPG Endpoints). Otherwise, your HDHR, M3U, and/or EPG links will be publicly accessible over the internet
/hdhr/*/output/m3u/*/output/epg/*
-
If you'd like to set up GeoBlock for any/all resources, refer to Pangolin's official documentation for guidance
-
Test your new setup by navigating to Dispatcharr in an incognito or private window. You should now be met with your Pangolin login dashboard when accessing the WebUI when you're not authenticated, however your clients will still be able to connect to allow streaming
Nginx Proxy Manager
Follow these steps to setup access to Dispatcharr through Nginx Proxy Manager. This guide assumes that Nginx Proxy Manager is already setup and has SSL certificates configured. Setting up Nginx Proxy Manager and certs is out of scope for this guide. You can find setup info at the Nginx Proxy Manager install guide and at this blog.
- This was created on version 2.14.0 of Nginx Proxy Manager. Other versions have not been tested
- Domain is blurred out for privacy. You can purchase a domain or create a local use domain. Setting up a domain is out of scope, but there are lots of guides that cover this
-
Setup Nginx Proxy Manager. See above link for instructions
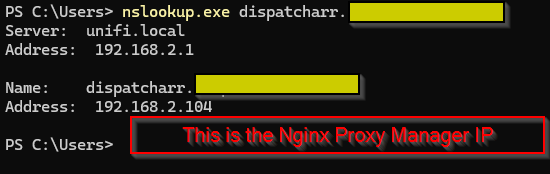
-
Create DNS entry resolving Dispatcharr domain name to Nginx Proxy Manager LAN IP
- This step is dependent on what router you use
Screenshot
-
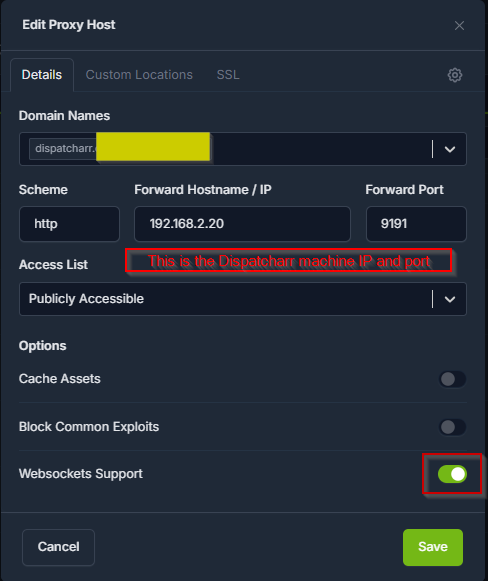
Create new proxy host in Nginx Proxy Manager
Screenshot

-
Enter the domain name created in step 2
-
Scheme:
http -
Forward Hostname/IP:
<IP address of Dispatcharr server> -
Forward port:
9191 -
Select
Websockets SupportScreenshot
Note
The custom SSL config added in step 14 also sets the Websocket support. We've tested with
Websocket Supporttoggled on and off and have not noticed a difference -
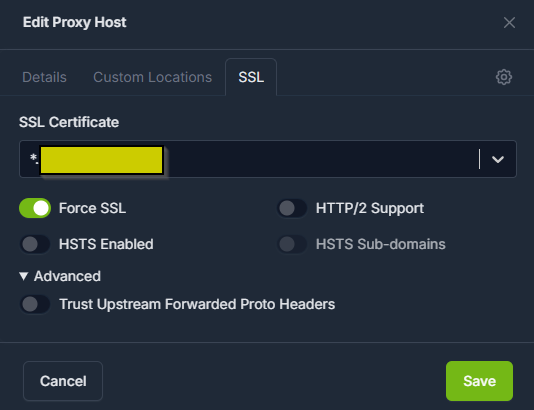
Select SSL (on the top tap under
Edit Proxy Host) -
Choose your SSL certificate
-
Creating SSL certs is outside the scope of this guide. See above link for the Nginx Proxy Manager install documentation
-
Recommend setting up wildcard SSL certs for your domain. If using Cloudflare for your domain, see this guide for instructions
-
-
Select
Force SSLScreenshot
-
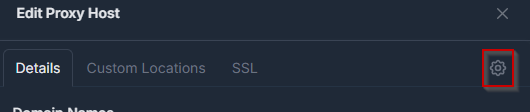
Select
Detailstab -
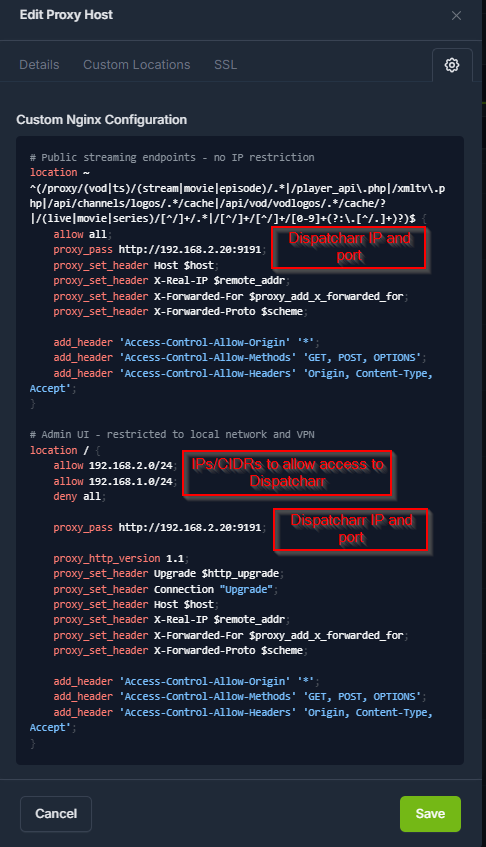
Select the gear icon for custom Nginx configuration
Screenshot
-
Paste in the below config example, making sure to change the variable names as needed. Variables are in <> and ALL CAPS. Values to change are the Nginx Proxy Manager IP and the Dispatcharr IP
Example (click to see)
# Dispatcharr HTTPS Nginx Proxy Manager
location ~ ^(/proxy/(vod|ts)/(stream|movie|episode)/.*|/player_api\.php|/xmltv\.php|/api/channels/logos/.*/cache|/api/vod/vodlogos/.*/cache/?|/(live|movie|series)/[^/]+/.*|/[^/]+/[^/]+/[0-9]+(?:\.[^/.]+)?)$ {
    allow all;
    proxy_pass http://<DISPATCHARR IP ADDRESS>:9191;
    proxy_set_header Host $host;
    proxy_set_header X-Real-IP $remote_addr;
    proxy_set_header X-Forwarded-For $proxy_add_x_forwarded_for;
    proxy_set_header X-Forwarded-Proto $scheme;

    add_header 'Access-Control-Allow-Origin' '*';
    add_header 'Access-Control-Allow-Methods' 'GET, POST, OPTIONS';
    add_header 'Access-Control-Allow-Headers' 'Origin, Content-Type
Accept';
}

# Restrict access.  In this instance all traffic to Dispatcharr flows through proxy.  You can add another allow block if you want to allow traffic not through the proxy.
location / {
    allow <NPM IP ADDRESS>/32;
    deny all;

    proxy_pass http://<DISPATCHARR IP ADDRESS>:9191;

    proxy_http_version 1.1;
    proxy_set_header Upgrade $http_upgrade;
    proxy_set_header Connection "Upgrade";
    proxy_set_header Host $host;
    proxy_set_header X-Real-IP $remote_addr;
    proxy_set_header X-Forwarded-For $proxy_add_x_forwarded_for;
    proxy_set_header X-Forwarded-Proto $scheme;

    add_header 'Access-Control-Allow-Origin' '*';
    add_header 'Access-Control-Allow-Methods' 'GET, POST, OPTIONS';
    add_header 'Access-Control-Allow-Headers' 'Origin, Content-Type
Accept';
}
Screenshot
-
Select
Save -
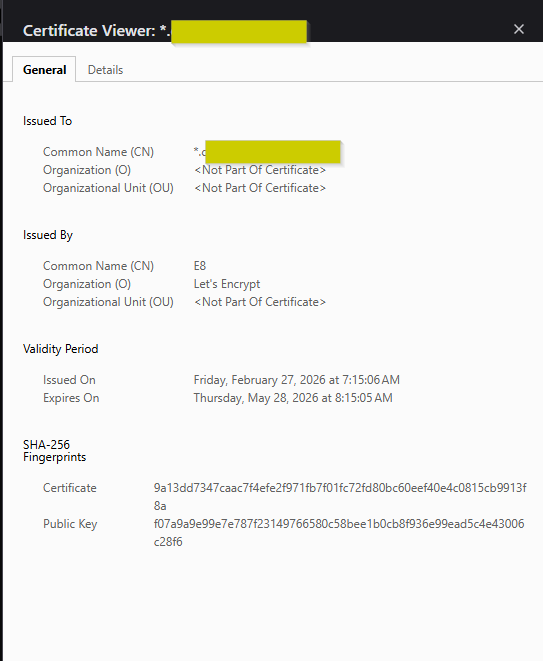
Verify access by visiting Dispatcharr DNS name in browser. Verify that the SSL certificate is valid.
Screenshot
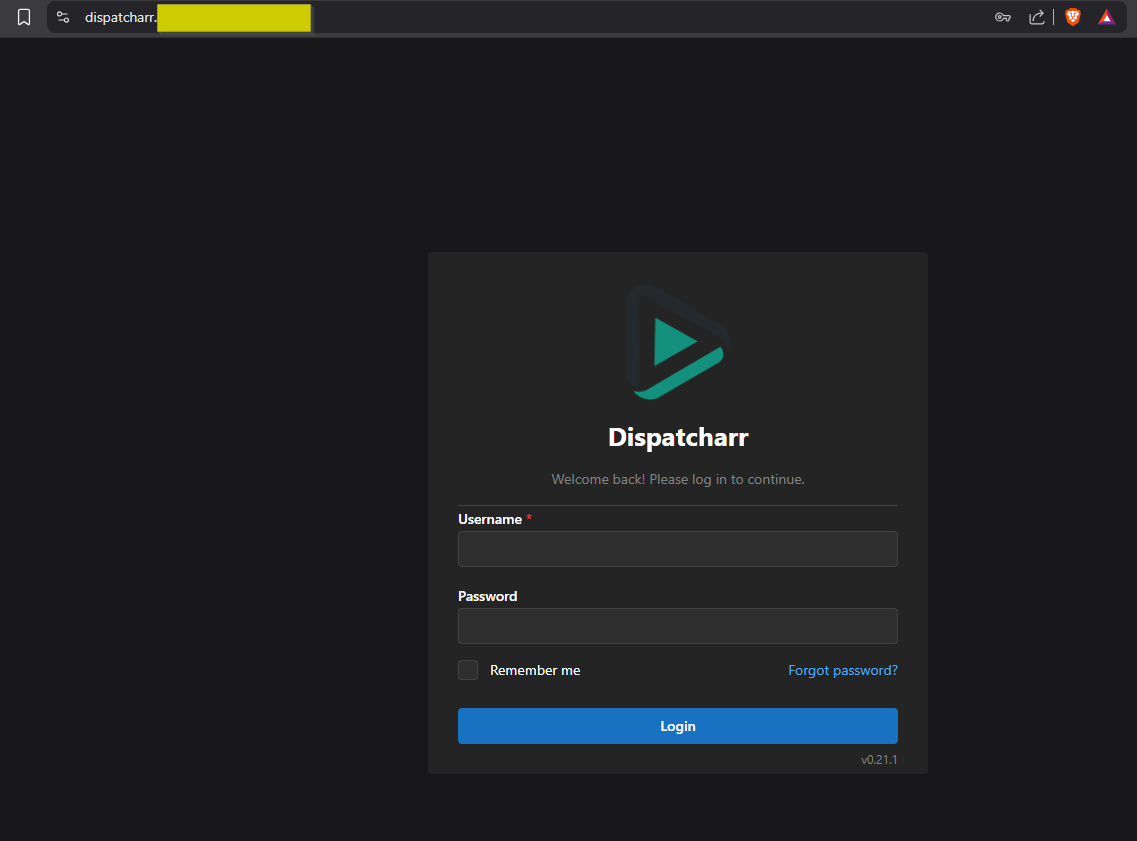
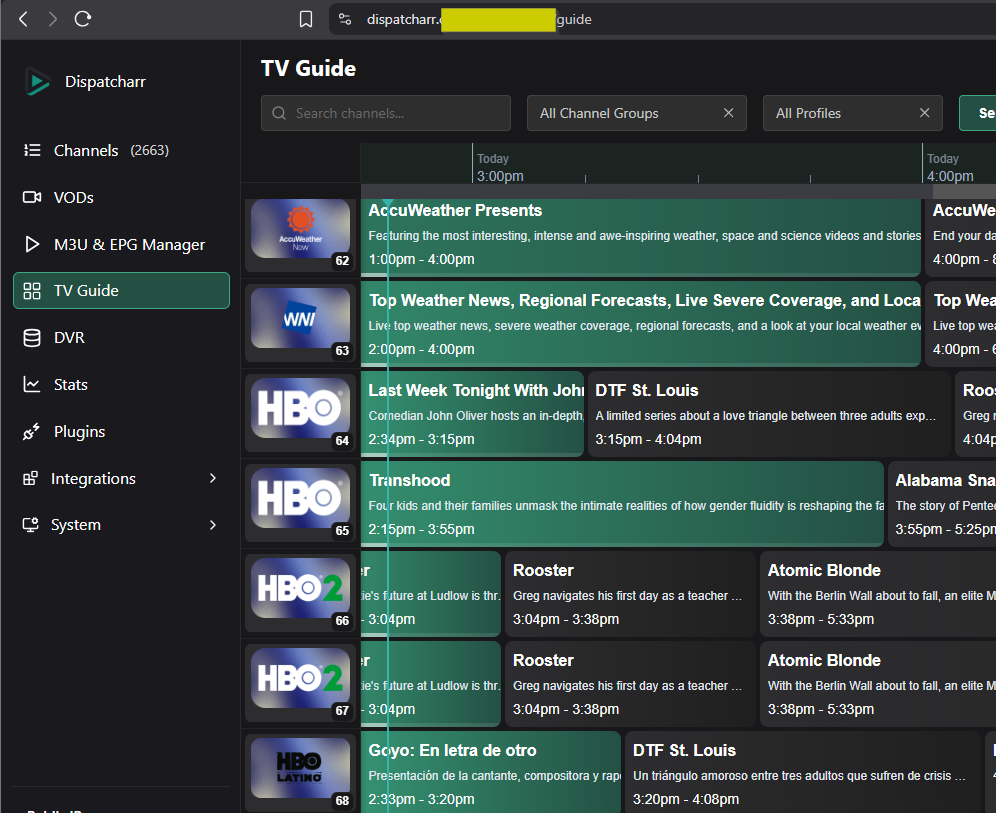
-
Login and enjoy!
Screenshot
Note
If you point Pangolin at the Nginx Proxy Manager as a resource, you can access Dispatcharr through this instead of creating a new entry.
Connection Security
TLS encrypts connections between Dispatcharr and external Redis/PostgreSQL services in modular deployments. This prevents credentials and data from being sent in plaintext over the network.
Note
Connection security is only available in modular deployment mode. AIO mode uses internal services that do not require encryption.
Overview
Three levels of connection security are supported:
| Level | What it does | When to use |
|---|---|---|
| TLS | Encrypts traffic between Dispatcharr and the database | Connections cross a network boundary |
| TLS + Server Verification | Encrypts traffic and verifies the server's identity using a CA certificate | Protecting against man-in-the-middle attacks |
| Mutual TLS (mTLS) | Both sides verify each other with certificates | The database server requires client authentication |
Each level builds on the previous one. You can enable encryption without verification, or verification without mutual TLS.
Certificate Volume Mount
Server verification and mutual TLS require certificate files to be accessible inside the container. If you are only encrypting the connection without verification, no certificate files are needed.
Mount a directory containing your certificates as a read-only volume:
Mount the same volume on both the web and celery services.
Redis TLS
| Variable | Required | Description |
|---|---|---|
REDIS_SSL |
Yes | Set to true to enable TLS |
REDIS_SSL_VERIFY |
No | Verify the server's identity (default: true). Set to false for self-signed certs without a CA |
REDIS_SSL_CA_CERT |
No | Path to the CA certificate used to verify the server |
REDIS_SSL_CERT |
No | Path to the client certificate (only if the server requires client authentication) |
REDIS_SSL_KEY |
No | Path to the client private key (only if the server requires client authentication) |
Redis TLS — encrypted with server verification
Redis mTLS — mutual authentication
PostgreSQL TLS
| Variable | Required | Description |
|---|---|---|
POSTGRES_SSL |
Yes | Set to true to enable TLS |
POSTGRES_SSL_MODE |
No | How strictly to verify the server (default: verify-full). Options: verify-full, verify-ca, require |
POSTGRES_SSL_CA_CERT |
No | Path to the CA certificate used to verify the server |
POSTGRES_SSL_CERT |
No | Path to the client certificate (only if the server requires client authentication) |
POSTGRES_SSL_KEY |
No | Path to the client private key (only if the server requires client authentication) |
Verification modes:
verify-full— verifies the server certificate and checks that the hostname matches (most secure, default)verify-ca— verifies the server certificate but does not check the hostnamerequire— encrypts the connection but does not verify the server's identity
PostgreSQL TLS — encrypted with full verification
PostgreSQL TLS — encrypted, no verification
PostgreSQL mTLS — mutual authentication
Important Notes
- TLS environment variables must match across the
webandceleryservices - Certificate paths refer to paths inside the container, not on the host
- Dispatcharr validates certificate file paths at startup and will fail with a clear error message if a file is not found
- If you override
REDIS_URLorCELERY_BROKER_URLwith a custom value, the URL scheme (redis://vsrediss://) must match theREDIS_SSLsetting. Most users do not need to set these — Dispatcharr builds the URL automatically - The Connection Security panel in System Settings displays the current TLS status for each service